 Save to Pinterest
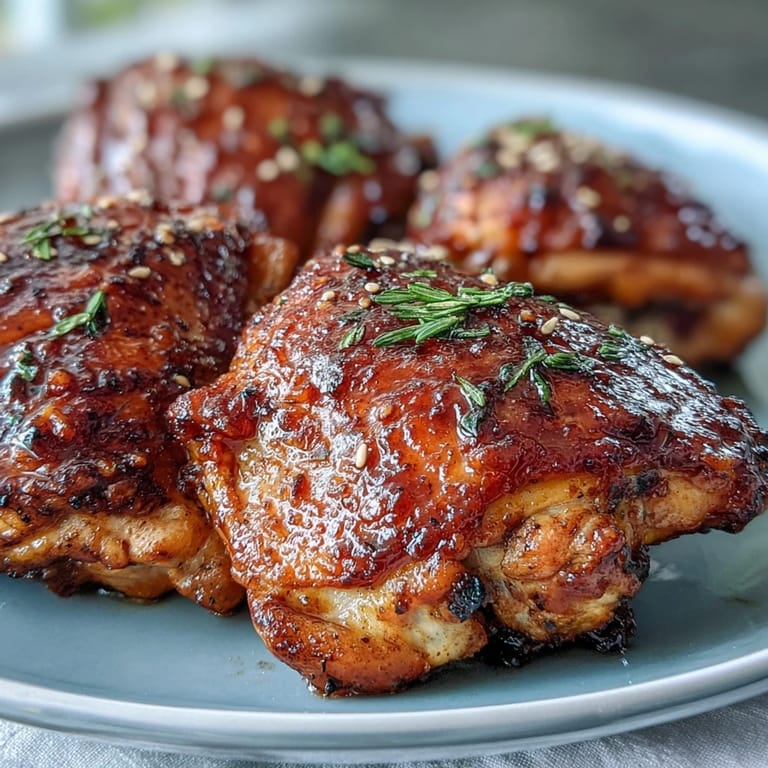
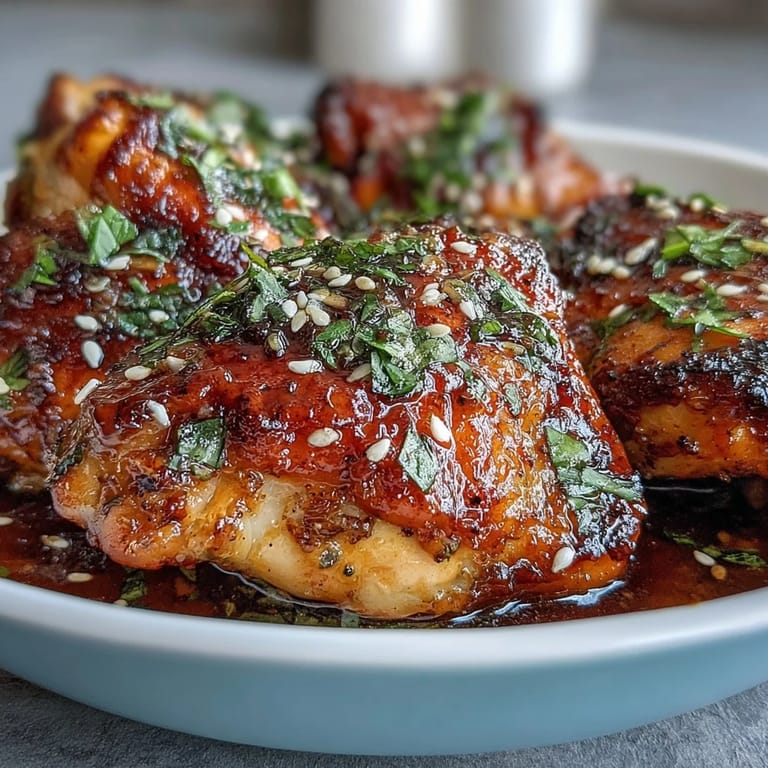
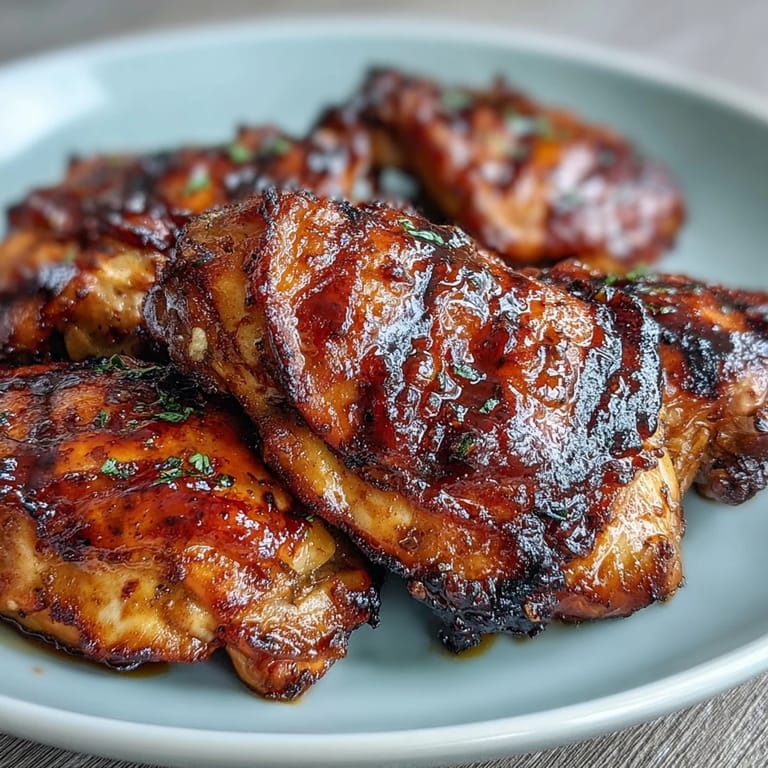
 There's something about the smell of honey and garlic hitting a hot oven that just stops you in your tracks. My neighbor came over one evening asking what that incredible aroma was, and I realized I'd been making these honey garlic chicken thighs without ever really thinking about how simple they were. Turns out, the best meals don't need fancy technique or a long ingredient list, just good chicken, good heat, and a glaze that does all the work for you.
I made this for my sister's family on a random Tuesday, and her eight-year-old asked for thirds, which was basically a standing ovation in that house. She kept dunking bread into the glaze pooled at the bottom of the pan, and her mom was giving me this look like I'd unlocked some secret code to getting kids to eat their protein.
Ingredients
- Bone-in, skin-on chicken thighs: Use 8 pieces because the bone keeps everything moist and the skin is where the magic happens when it hits that high heat.
- Honey: This is your sweetness and it caramelizes beautifully, so don't skip it or swap it for something else at the last minute.
- Soy sauce: The umami backbone that makes people wonder what you put in here, pick a decent one because you can taste the difference.
- Fresh garlic: Mince it fine so it melts into the sauce instead of sitting there in chunks.
- Apple cider vinegar: Just enough tang to balance the honey and keep everything from being too one-note sweet.
- Olive oil: Helps the glaze coat everything evenly and contributes to that golden color.
- Smoked paprika: A tiny pinch of this adds depth and a whisper of smokiness that makes people pause mid-bite.
- Chili flakes: Optional, but they're nice if you want a gentle heat that builds as you eat.
- Fresh parsley and sesame seeds: These are your finishing touches, don't skip them because they add brightness and visual appeal.
Tired of Takeout? 🥡
Get 10 meals you can make faster than delivery arrives. Seriously.
One email. No spam. Unsubscribe anytime.
Instructions
- Get your oven ready:
- Preheat to 400°F and line your baking dish with foil so you're not scrubbing sticky glaze later, trust me on this.
- Dry out that chicken:
- Pat each thigh with paper towels until the skin is genuinely dry, this is how you get it crispy instead of steamed. Season generously on both sides.
- Arrange with breathing room:
- Place the thighs skin-side up in the dish with a little space between each one so the heat can circulate.
- Mix your magic sauce:
- Whisk together the honey, soy sauce, minced garlic, vinegar, oil, paprika, and chili flakes until it's smooth and beautiful. Taste it straight from the spoon, it should make you want to drink it.
- Coat everything:
- Pour the sauce over the chicken and use a brush or spoon to make sure the skin gets covered, you want that glaze to caramelize everywhere.
- Bake with a baste:
- Put it in the oven for about 30 to 35 minutes, and halfway through pull it out and baste the chicken with the sauce pooling at the bottom. The kitchen will smell unreal.
- Crisp it up if you're feeling it:
- If you want extra-golden skin, hit it under the broiler for 2 to 3 minutes at the very end, but watch it closely because things can go dark fast.
- Let it rest:
- Pull it out and let it sit for 5 minutes before serving so the juices redistribute and everything stays tender.
- Finish with color:
- Scatter parsley and sesame seeds on top right before plating, it makes it look intentional and tastes even better.
 Save to Pinterest
 I watched my friend's face when she tasted this for the first time, that moment where her eyes widened and she said nothing for a second. That's when I knew it wasn't just about the food, it was about how something this easy could make someone feel genuinely cared for.
Why Chicken Thighs Win
Dark meat is more forgiving than white meat, it stays moist even if your oven runs hot or you lose track of time. The bone adds flavor and the fat under the skin is what makes that glaze stick and caramelize into something incredible. Once you start cooking thighs regularly, chicken breast feels like a memory.
The Glaze Strategy
The sauce is where everything happens, and the basting step halfway through is the secret that separates good from great. When you brush that caramelized glaze back over the chicken in the second half of cooking, you're building layers of flavor and getting that mahogany color that makes people photograph their food. It's not fussy, it's just ten seconds with a brush that changes everything.
Make It Your Own
This recipe is a template that loves to be played with, I've seen people add ginger, a splash of lime juice, even a touch of fish sauce for more depth. The base is solid enough to handle experiments and forgiving enough that you can't really break it. Some nights I add extra chili flakes for heat, other times I skip the paprika and lean into pure garlic sweetness.
- Boneless thighs will cook in 25 to 30 minutes, shaving time off your dinner if you're in a rush.
- Make the sauce the night before and marinate the chicken in it for up to 12 hours for deeper flavor that tastes more intentional.
- Serve it over rice to catch every drop of glaze, or with roasted vegetables for something lighter.
 Save to Pinterest
 This dish has become my answer to almost every question about what to cook, because it's genuinely easy but tastes thoughtful. Make it once and it'll become the thing people remember you for.
Recipe Questions & Answers
- → Can boneless chicken thighs be used?
Yes, boneless thighs can be substituted and will reduce baking time to about 25-30 minutes.
- → How can the skin be made extra crispy?
Broil the chicken on high for 2-3 minutes at the end of cooking while watching closely to prevent burning.
- → Is it necessary to marinate the chicken beforehand?
Marinating for up to 12 hours enhances flavor, but it's optional as the glaze bakes into the chicken during cooking.
- → What sides pair well with this dish?
Steamed rice, roasted vegetables, or a crisp salad complement the rich honey garlic chicken perfectly.
- → Can this dish be made gluten-free?
Yes, use gluten-free soy sauce to ensure the dish is suitable for gluten-sensitive diets.