 Save to Pinterest
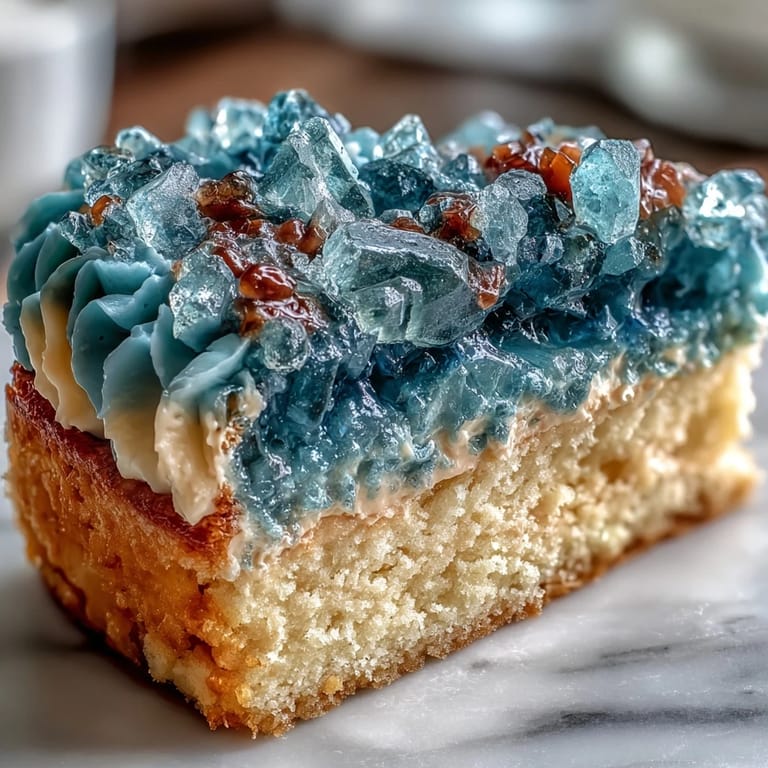
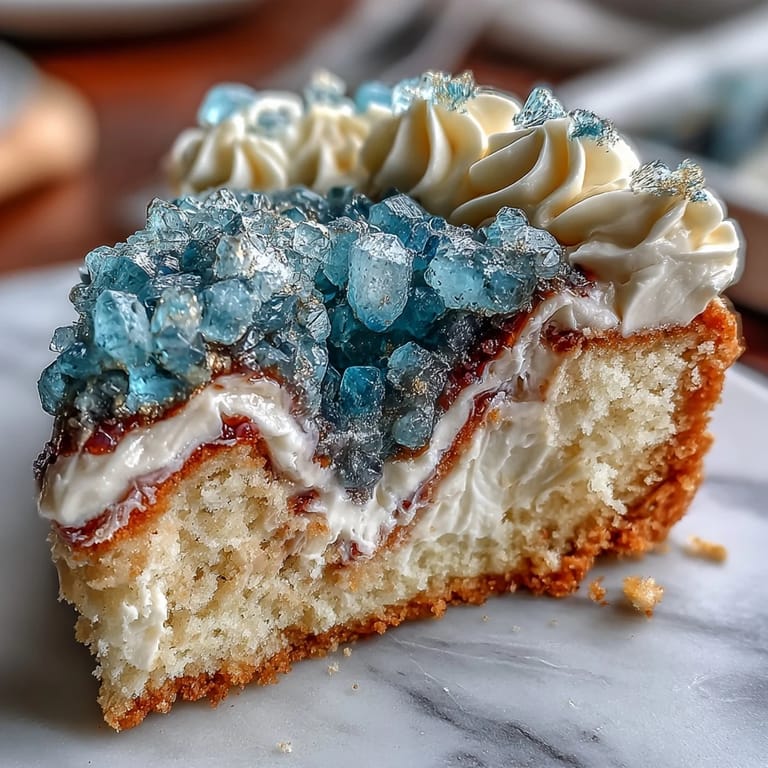
 The first time I finished assembling this graduation cake, my kitchen was covered in sparkling sugar crystals and tiny flecks of gold leaf. There was a quiet, contagious buzz as teal food coloring stained my fingers and laughter bounced off the tile floors. Instead of feeling intimidating, decorating the geode slice felt like playing with art supplies you could eat. I remember how the sunlight hit the sugar crystals, making the cake shimmer like an actual gemstone. Sometimes, it's the process as much as the result that makes a dessert unforgettable.
There was a moment last June when my cousin, nervously awaiting her diploma, peeked into the fridge and gasped at the glimmering cake. We ended up giggling over which rock candy chunk looked most like a real geode, and for a fleeting afternoon, the pressure of final grades faded behind the promise of a glittering slice.
Ingredients
- All-purpose flour: Sift it for a fluffy crumb that holds up to the weight of all those sugar crystals.
- Baking powder: Even after all these cakes, I still double-check to avoid the heartbreak of a dense layer.
- Salt: A pinch is all you need to keep the sweetness in check.
- Unsalted butter: Let it come to room temperature for the silkiest creaming and a plush cake texture.
- Granulated sugar: Creaming sugar into butter until it's pale and fluffy builds a strong, airy foundation.
- Eggs: Bring them to room temp so the batter doesn't curdle and bakes evenly.
- Vanilla extract: Opt for pure vanilla to let the cake shine—once, artificial left a sharp aftertaste.
- Whole milk: The richness balances the airy crumb and helps everything mix smoothly.
- Powdered sugar: Sifted, it makes the buttercream impossibly light—no graininess, just clouds.
- Heavy cream: Adding this a spoonful at a time lets you adjust the frosting to just-spreadable perfection.
- Teal gel food coloring: Use a toothpick for control so you don’t end up with electric blue hands or cake.
- Rock sugar crystals: These catch the light and turn dessert into decor—a little mixing with gel dye and you’ll see magic happen.
- Edible gold leaf or gold luster dust: A small detail, yet it elevates the whole cake (apply with a food-safe brush and patience).
- Simple syrup: Optional, but brushing it on keeps cake layers as fresh as the day you baked them.
Tired of Takeout? 🥡
Get 10 meals you can make faster than delivery arrives. Seriously.
One email. No spam. Unsubscribe anytime.
Instructions
- Bake the Vanilla Cake:
- Set your oven to 350°F and line three 8-inch pans. Mix flour, baking powder, and salt, then cream your butter and sugar until pale and almost mousse-like—your mixer will sound different when it’s right.
- Add Wet Ingredients:
- Work in the eggs one at a time and follow with vanilla, watching the batter slowly gloss up. Alternate adding the dry ingredients and milk, scraping down the bowl so everything gets blended (no hidden lumps).
- Bake and Cool:
- Scoop the batter evenly into the pans and bake until the tops spring back and a skewer comes out clean—singing along to your playlist optional but recommended. Let them cool 10 minutes before turning out onto racks, resisting the urge to sneak a bite.
- Make the Buttercream:
- Whip the butter until it’s creamy and slightly lighter, then gradually add powdered sugar before splashing in vanilla and cream. Tint most of the buttercream a punchy teal, leaving a small amount white for crumb coating.
- Color the Crystals:
- Add teal gel color to the rock sugar; mix gently until crystals resemble tiny blue jewels. Spread them on parchment to dry if they get sticky.
- Stack the Layers:
- If needed, level out cake domes. Brush with simple syrup if you like, then layer with buttercream and apply a crumb coat with the reserved white frosting.
- Frost and Smooth:
- Chill for 20 minutes, then frost the cake with teal buttercream in swoops and swirls. Use an offset spatula to give the sides and top that professional, polished edge.
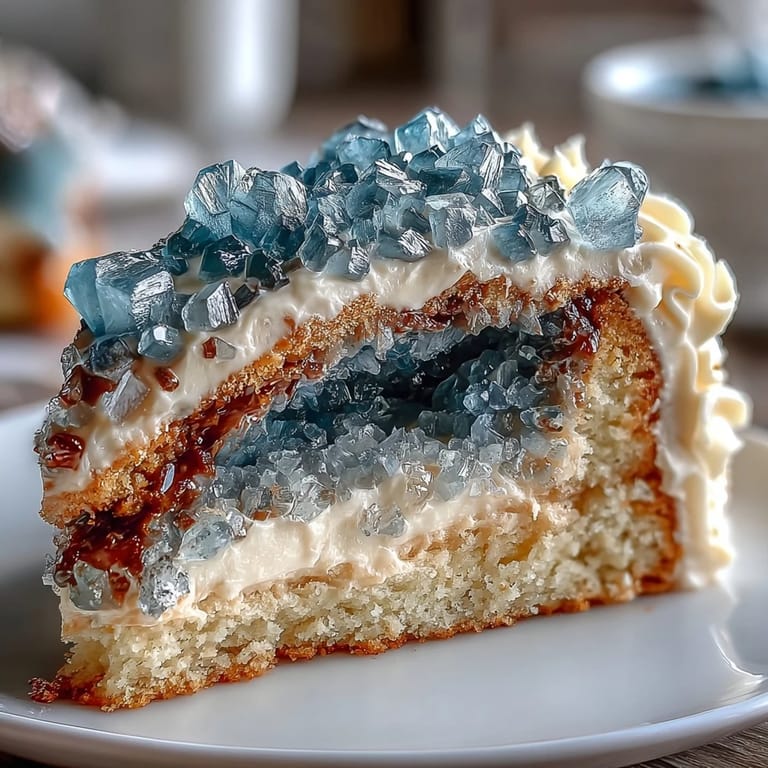
- Carve the Geode:
- Carefully cut a wedge from the side—a satisfying, slightly nerve-wracking moment. Coat the cut with buttercream and layer on the colored crystals, arranging lighter and darker shades for depth.
- Add the Gold:
- With a food-safe brush, lightly dab gold leaf or paint around the sugar to frame your geode slice. Step back and admire the sparkling contrast.
- Finishing Touches:
- Add any extra gold accents, clean up stray sugar, and maybe add a graduation topper for the final celebration.
 Save to Pinterest
 When we sliced into the cake, golden flecks sparkled in the late-afternoon light and someone murmured, 'This is almost too pretty to eat.' But every forkful was celebrated like the diploma itself—a shared joy that instantly became tradition with just one geode cake.
Making the Most of Rock Sugar Crystals
Dyeing sugar crystals is hands-on fun—spread them out in a single layer after coloring so they don't stick, and use your fingers to layer different depths of teal for a more realistic geode effect. Mixing light and dark bits right at the base of your cake cut-out brings the illusion to life, almost like painting with sugar.
How to Nail the Teal Buttercream
The secret is coloring a little at a time and letting the gel color develop for a few minutes before adjusting. Always save some uncolored buttercream—you'll be glad you did when you need a crisp white background for the geode wedge.
Gold Detailing Without Drama
Working with edible gold always delivers a wow moment, but go slow—use clean, dry tweezers or a gentle brush for gold leaf. If you're using luster dust, mix a drop of clear alcohol to create a barely-there paint that's easy to control.
- Store leftover gold leaf in the package, as it flies away with the smallest breeze.
- A tiny corner of the cake is all you need to highlight with metallic accents—it doesn't have to be everywhere.
- Finish gold details before adding a topper so nothing smudges.
 Save to Pinterest
 This teal and gold geode cake brings artistry and celebration together—no two will ever be alike, but each one captures a little piece of the occasion. Happy baking and even happier celebrating!
Recipe Questions & Answers
- → How do I achieve the geode look?
Use teal-tinted rock sugar crystals pressed into a buttercream-filled wedge on the cake, then accent edges with edible gold.
- → Can I use different food coloring for the crystals?
Yes, combining teal with blue or other shades creates depth and adds a unique effect to the geode centerpiece.
- → What makes the cake extra moist?
Optionally brushing cake layers with simple syrup before assembling keeps each bite soft and flavorful.
- → Which tools are essential for decoration?
An offset spatula, serrated knife, and food-safe paintbrush are helpful for smooth frosting and applying gold accents.
- → Are there flavor variations for the base?
Try adding lemon or almond extract for a brighter or richer cake flavor to suit your taste preferences.