 Save to Pinterest
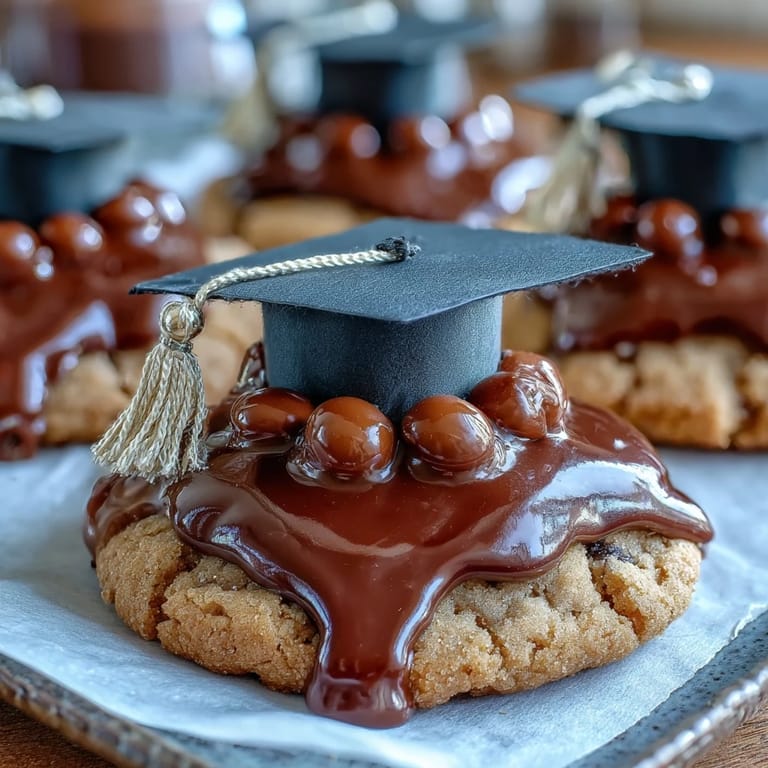
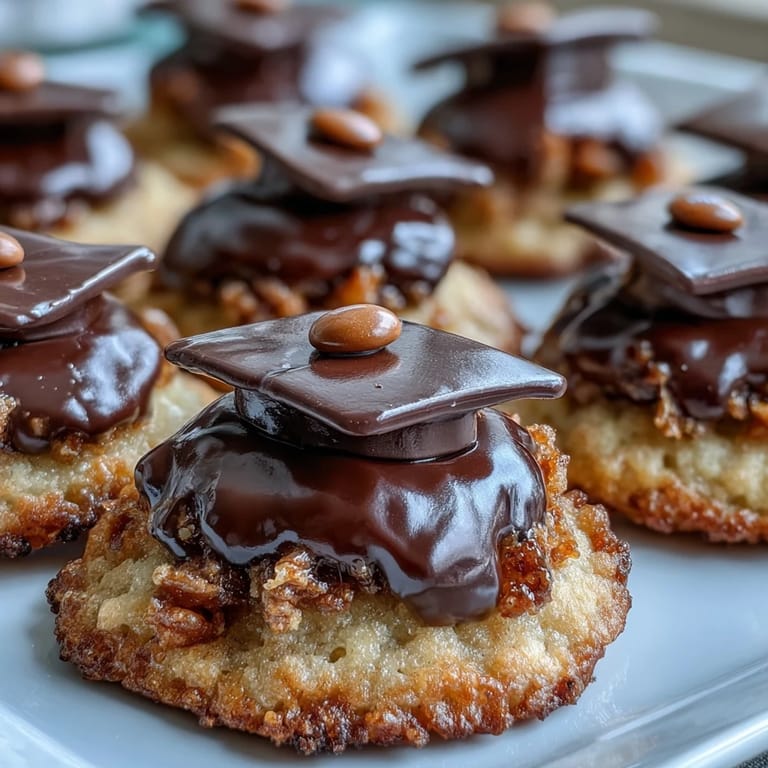
 My sister called me three weeks before her graduation, voice bright with nervous energy, asking if I could make something special for her party. I found myself standing in the kitchen at midnight, sketching graduation caps on paper, imagining how cookies could capture that exact feeling of accomplishment. These butter-soft sugar cookies, crowned with glossy black royal icing and tiny golden tassels, became my answer—a edible celebration that somehow feels both elegant and playfully festive.
I still remember my nephew's face when he bit into one at the celebration, not expecting the buttery crispness under that smooth black shell. He immediately grabbed another, and I watched him study the tiny M&M tassel like it was the most important detail he'd ever noticed. That moment taught me that food memories aren't just about flavor—they're about those small surprises that make people smile.
Ingredients
- All-purpose flour (2 1/2 cups): The backbone of a tender cookie, and sifting it once keeps your dough from becoming dense and heavy.
- Unsalted butter (3/4 cup, softened): Room temperature is non-negotiable here—cold butter will sabotage your creaming and leave you with tough cookies that disappoint.
- Granulated sugar (1 cup): This dissolves into the butter creating that light, airy texture that makes these cookies snap rather than crumble.
- Egg (1 large): Acts as your binding agent, so don't skip it or substitute unless you know what you're doing.
- Vanilla extract (2 teaspoons for dough, 1/2 teaspoon for icing): The vanilla is subtle but transforms these from plain to genuinely delicious, so use the real stuff.
- Baking powder (1/2 teaspoon): Just enough to give the cookies a gentle lift without making them cakey.
- Salt (1/4 teaspoon): This tiny amount makes the butter and vanilla sing—never skip it.
- Powdered sugar (3 cups, sifted): For royal icing, sifting prevents lumps that will clog your piping bags and wreck your mood.
- Egg whites or meringue powder: Egg whites create the smoothest, most luxurious icing, but meringue powder is your safe option if raw eggs worry you.
- Black and yellow gel food coloring: Gel holds its color better than liquid food coloring and won't thin your icing into soup.
- Mini M&Ms or candy pearls: These become your tassel anchors, adding a pop of color that catches the light.
Tired of Takeout? 🥡
Get 10 meals you can make faster than delivery arrives. Seriously.
One email. No spam. Unsubscribe anytime.
Instructions
- Whisk your dry ingredients:
- Combine flour, baking powder, and salt in a bowl, giving everything a good whisk to distribute the baking powder evenly throughout. This prevents pockets of raw baking powder taste in your finished cookies.
- Cream butter and sugar until clouds form:
- Beat them together for a full two to three minutes—you're looking for that pale, fluffy texture that means you've incorporated enough air. This is actually the most important step for cookie texture, so don't rush it.
- Add egg and vanilla, then mix gently:
- Incorporate these one at a time, beating just until each addition disappears into the creamed butter. Over-mixing at this stage can make cookies tough.
- Fold in the flour mixture slowly:
- Add the dry ingredients in three additions, stirring just until combined after each one. The dough should come together without any visible flour streaks.
- Chill the dough for its full thirty minutes:
- Don't skip this step thinking you're saving time—cold dough prevents spreading and gives you defined, crisp edges. Wrap each disk in plastic wrap and refrigerate.
- Roll and cut with confidence:
- Dust your work surface and rolling pin with flour, then roll the dough to exactly 1/4-inch thickness for consistent baking. A graduation cap or square cutter works perfectly and makes the decorating feel intentional.
- Bake until edges turn golden:
- Watch for that pale golden color at the edges—they'll only need eight to ten minutes and will firm up as they cool. Overbaked cookies lose their tender quality and start tasting slightly burnt.
- Cool completely before decorating:
- This seems tedious but warm cookies and icing are enemies. Once they're room temperature, they're ready for their transformation.
- Beat egg whites into stiff peaks:
- The icing should be glossy and hold peaks when you lift the beaters—this takes about five minutes and is worth every second. If using meringue powder, whisk it with water first until foamy before adding sugar.
- Tint your icing with strategic color:
- Reserve a small portion of plain white icing, then tint the bulk black and a separate tiny bit yellow. Gel coloring is your friend here because it won't dilute the icing.
- Adjust icing consistency for each task:
- Thinner icing for flooding (add water teaspoon by teaspoon), thicker for piping the tassels (add powdered sugar). This is where patience with tiny adjustments pays off in professional-looking results.
- Outline and flood with black icing:
- Pipe a thin black outline around each cookie cap, then fill the interior with slightly thinner icing using a toothpick to spread it gently to the edges. Let this set for at least thirty to sixty minutes until it firms completely.
- Pipe yellow details and place tassels:
- Once the black base is completely set, switch to your yellow icing in a small piping bag and create a tiny button and tassel on each cap. Top each tassel end with a mini M&M or candy pearl while the yellow icing is still slightly tacky so it adheres.
- Let everything dry fully overnight:
- These cookies need several hours, ideally overnight, for the icing to completely harden and set. This final step ensures they're stable and package beautifully.
 Save to Pinterest
 There's something magical about watching someone's face when they recognize their own milestone captured in a cookie you made with your own hands. My brother kept one on his desk for weeks, not because it was still edible, but because it meant something—someone had spent an evening decorating tiny graduation caps just to celebrate his achievement.
The Secret to Crispy Cookie Texture
The magic happens in that creaming stage where butter and sugar become pale and fluffy, incorporating tiny air bubbles that create structure as the cookies bake. I learned this the hard way after making dense cookies for years, not realizing I was only beating them for thirty seconds. Now I set a timer and actually listen for the mixer to shift from sounding labored to almost whipping the mixture—that's when you know you've done it right.
Making Royal Icing That Actually Works
Royal icing intimidated me until I realized it's just sugar, egg whites, and a little patience—nothing mystical about it. The consistency adjustment is crucial though; I keep a small spoon of water nearby because the difference between flooding consistency and piping consistency is literally a teaspoon of water. Consistency that's too thin spreads everywhere and looks messy, too thick and you'll be cursing while trying to pipe delicate tassels.
Decorating Without Perfectionism
Here's what surprised me: the cookies that looked most charming were often the ones where my piping was slightly imperfect, where the tassel wasn't exactly centered or the black base had a tiny irregular edge. There's beauty in the handmade quality, in the evidence that someone cared enough to decorate each one individually. These aren't meant to look factory-perfect; they're meant to look like love in cookie form.
- Let the black base set completely before adding yellow details, or you'll end up with muddy colors bleeding together.
- If royal icing cracks or dries too fast while you're piping, add a single drop of water and beat briefly to loosen it up.
- Store decorated cookies in an airtight container with parchment between layers so the icing doesn't stick and the flavor stays fresh for days.
 Save to Pinterest
 Make these cookies not because graduation only comes once, but because someone you care about deserves to be celebrated with food made from scratch. They'll taste the difference, even if they can't quite name it.
Recipe Questions & Answers
- → What gives the cookies their crisp texture?
The combination of chilled dough and precise baking time creates a firm, buttery crunch without overbaking.
- → How is the royal icing prepared for decoration?
Egg whites or meringue powder are beaten with powdered sugar until stiff peaks form, then tinted with gel coloring for detailed piping.
- → Can I use natural food coloring for the icing?
Yes, natural alternatives can replace gel food coloring though results may vary slightly in vibrancy and texture.
- → What tools help achieve clean edges and decorations?
Using a piping bag with small round tips and toothpicks helps outline and flood the cookies with precision.
- → How should decorated treats be stored?
Allow icing to fully dry, then store in an airtight container at room temperature to maintain texture and freshness.