 Save to Pinterest
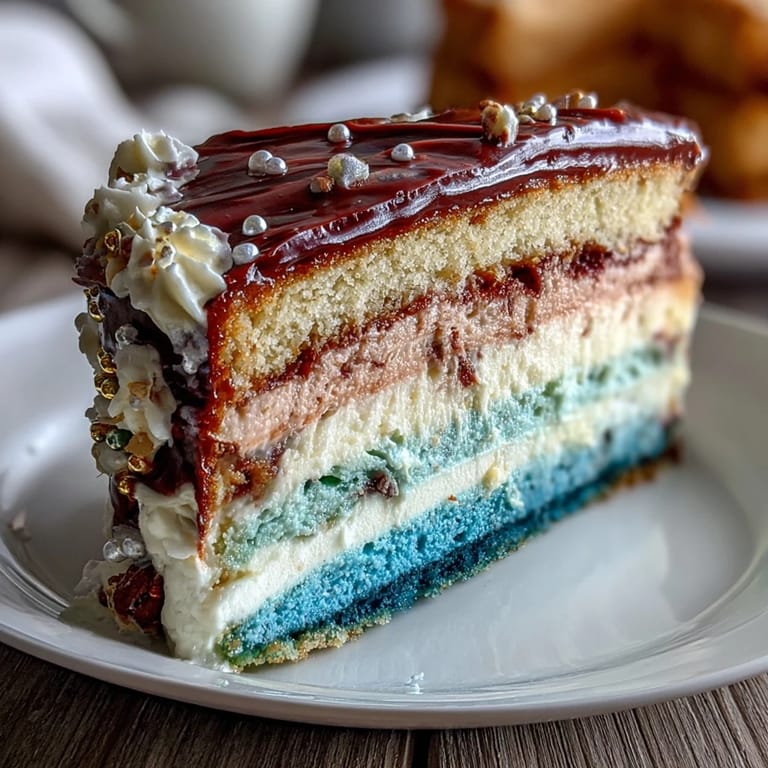
 My cousin called me three weeks before her graduation asking if I could make her cake, and honestly, I almost said no—four layers seemed ambitious. But then she described what she wanted: something that looked like a sunset in her school colors, each layer slightly deeper than the last. By the time we hung up, I was already imagining how to pull it off, and I knew this ombre cake would be worth every minute of careful planning.
The night before the party, I realized I'd tinted the batters a bit too pale, so I added just a touch more gel color to the darkest layer—and that tiny adjustment saved everything. Standing in my kitchen at midnight, watching those four layers cool on racks, I felt like I was holding something precious, not just a cake.
Ingredients
- All-purpose flour (3 1/4 cups): Measure by spooning into your measuring cup and leveling with a knife—scooping directly from the bag compacts it and throws off your ratios.
- Baking powder (2 1/2 tsp): Check the expiration date; old baking powder won't give you the tender crumb you're counting on.
- Unsalted butter (1 cup, softened): Leave it out for about an hour until it yields slightly when you press it—cold butter won't cream properly with the sugar.
- Granulated sugar (2 cups): Creaming it with the butter incorporates air, which is what gives this cake its light, delicate texture.
- Eggs (4 large, room temperature): Cold eggs don't incorporate smoothly and can cause the batter to seize; set them out while you prep everything else.
- Vanilla extract (1 tbsp): Use pure vanilla, not imitation—it actually changes the flavor profile noticeably.
- Whole milk (1 1/4 cups, room temperature): Room temperature milk blends into the batter without shocking the mixture or creating lumps.
- Gel food coloring: Gel is concentrated and won't thin your batter the way liquid coloring does, keeping your texture perfect.
- Egg whites (6 large): The foundation of Swiss meringue buttercream; separate them carefully so no yolk sneaks in.
- Unsalted butter (1 1/2 cups, softened and cubed): Cutting it into cubes helps it incorporate smoothly into the meringue without creating greasy streaks.
Tired of Takeout? 🥡
Get 10 meals you can make faster than delivery arrives. Seriously.
One email. No spam. Unsubscribe anytime.
Instructions
- Set up your stage:
- Preheat to 350°F and grease four 8-inch round pans, lining the bottoms with parchment—this is the one step that determines whether you're removing cake cleanly or scraping it out in pieces. Have all your ingredients measured and ready before you start mixing.
- Build the dry foundation:
- Whisk flour, baking powder, and salt together in a medium bowl; this ensures the leavening distributes evenly throughout the cake. Set it aside and don't skip this step—it makes a real difference in rise and texture.
- Cream butter and sugar:
- Beat them together for 2-3 minutes until the mixture is pale and fluffy, which looks almost like wet sand at first but then transforms into something light and airy. This is where you're incorporating air that becomes the cake's tender crumb.
- Incorporate eggs gently:
- Add eggs one at a time, beating well after each addition so they emulsify properly and create a stable batter. If the mixture looks slightly broken after adding an egg, keep mixing—it comes back together.
- Add vanilla and alternate wet and dry:
- Mix in vanilla, then add flour mixture and milk in alternating additions, starting and ending with flour; this prevents overmixing and keeps your cake tender. Stir just until combined—you're not making bread dough.
- Divide and tint:
- :
- Divide batter into four equal bowls and add increasing amounts of gel coloring to each, starting with barely a drop in the first bowl and building to your deepest shade in the fourth. The gradient should flow naturally from light to dark when you look at all four bowls together.
- Distribute to pans and bake:
- Pour each colored batter into its prepared pan, smooth the tops gently with an offset spatula, and slide them into the oven. Bake 22-25 minutes until a toothpick comes out clean and the cakes spring back when lightly touched.
- Cool with intention:
- Let cakes rest in pans for 10 minutes—they firm up enough to unmold cleanly—then turn them out onto racks to cool completely. Don't skip this cooling; warm cakes tear and crumble when you try to frost them.
- Create Swiss meringue buttercream:
- Whisk egg whites and sugar in a heatproof bowl over simmering water until you hit 160°F and the sugar dissolves completely, which takes about 5-7 minutes and feels like it's taking forever until suddenly the graininess disappears. Transfer to a mixer and whip on high for about 10 minutes until it forms stiff peaks and cools to room temperature.
- Butter in gradually:
- Add softened butter in small cubes, a handful at a time, letting each addition incorporate before adding more; the buttercream will look broken and lumpy at first, then suddenly comes together into silky frosting. If it gets too warm, chill it briefly and whip again.
- Tint if desired:
- Add vanilla extract and divide the buttercream into bowls if you want to create ombre piping or accent colors. Mix gel coloring into each portion until you reach your desired shade.
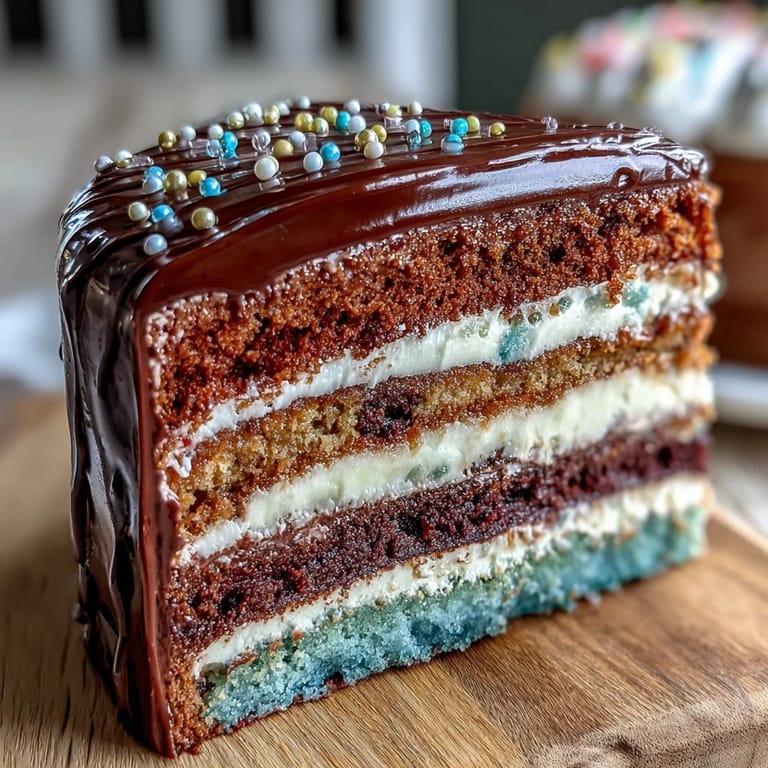
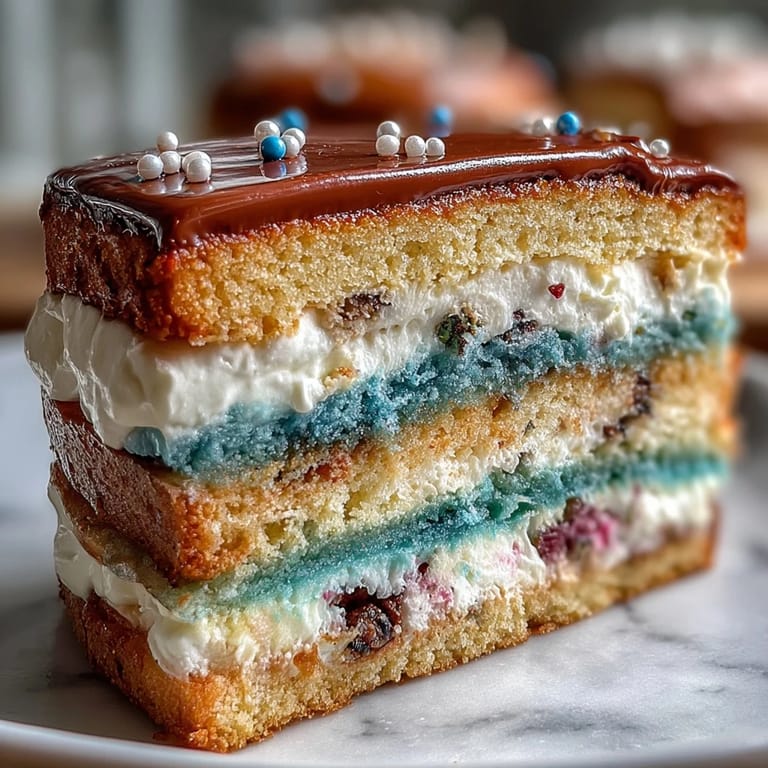
- Layer with purpose:
- Place the darkest cake layer on your stand, spread a generous layer of buttercream on top, then continue layering from darkest to lightest, building your ombre effect as you go. The visual payoff happens right here when you see those colors stacking up.
- Crumb coat and chill:
- Apply a thin coat of buttercream over the entire cake to seal in crumbs, then refrigerate for 20 minutes until it sets firm. This base layer prevents crumbs from getting mixed into your final frosting.
- Final frost and decorate:
- Apply your final buttercream layer, using an offset spatula or bench scraper to create smooth sides or blend the colors for an ombre effect. Add pearls, a graduation topper, or piped details, then chill until serving time.
 Save to Pinterest
 My cousin walked into the venue and just stopped when she saw the cake on the table, four perfect shades of blue graduating from pale sky to deep navy. Someone nearby said, 'Did you seriously make that?' and I felt every hour of planning and precision suddenly make complete sense.
The Ombre Effect That Actually Works
The secret to an ombre effect that looks intentional and not accidental is using gel coloring and being disciplined about your gradient—test your colors on a white plate before tinting your batter so you can see exactly how deep or pale each layer is. I've learned that sometimes less color is actually more; you want the shift to feel natural, not like someone dumped the entire bottle into one bowl. If you mess up a color, don't panic—you can always add more gel, but you can't take it out, so go gradually and build up to your ideal shade.
Making Transport Easier
If this cake is traveling to a party, frost it the day before and keep it in a cool place—buttercream actually sets up better overnight and tastes smoother because the flavors have time to meld. Load it into a cake box on a non-slip mat so it won't slide around in your car, and keep the vehicle cool on your way to the venue. I've learned to pack the cake box into a larger box with towels tucked around it for extra stability.
Beyond Basic Decoration
This cake is your canvas, so have fun thinking about what makes your celebration special—graduation colors, school initials, or even a custom topper make it feel personalized. You can pipe buttercream in contrasting colors to create patterns, add fresh flowers tucked between layers, or dust the top with edible luster dust for shimmer. The technical foundation is solid, so once you've nailed the basics, you're free to make it completely your own.
- Consider matching the cake colors to the graduation gown, school flag, or a favorite color combination the graduate loves.
- Edible gold or silver pearls catch light beautifully and add elegance without being fussy.
- A simple 'Class of 2024' message piped on top adds meaning without overcomplicating the design.
 Save to Pinterest
 This cake proves that something technically impressive doesn't have to be stressful—just show up with patience and pay attention to the details. Your graduate will remember this cake as much as they remember the ceremony itself.
Recipe Questions & Answers
- → How do I achieve the ombre effect in the layers?
Divide the batter equally and tint each portion with increasing amounts of gel food coloring for a smooth gradient across layers.
- → What is Swiss meringue buttercream and why use it?
It's a whipped frosting made by heating egg whites and sugar, then adding butter, creating a silky, less sweet finish that's stable and smooth.
- → Can I prepare this cake ahead of time?
Yes, bake layers and prepare buttercream in advance. Store chilled, assembling and decorating closer to serving.
- → What tools are essential for making this layered cake?
Use four 8-inch pans, mixer, piping bags with tips, parchment paper, and wire racks for cooling.
- → Are there alternatives to gel food coloring?
Gel colors provide more intense hues without thinning the batter, but liquid coloring can work with less vibrancy.